In a vain atempt to make something new, I embarked on a seemingly impossibly small smd project to make a single sided PCB for an electronic die.
Turned out just fine as it happens. It seems you can manage 10mil traces with very little clearance with toner transfer methods. Mental.
These are my notes from the Nerd Night talk:
Embedded electronics requires,
To go from Breadboards
To ratsnesting or perfboard/stripboard
To Wirewrap
Finally PCBs.
PCB is copper sheet on non-conducive substate.
Copper is etched aways to form tracks (wires) and pads (contacts for components).
Components soldered to pads.
Pros
Smaller boards esp through SMD.
Repetition and adjustment of circuits made easier.
Reliable/robust operation (providid manufacture is consistent).
Cons
You have to learn.
not so easy to make change or repair once made.
PCB design can be sent to fabrication house.
Only long runs but high quality.
Expensive and inflexible for learning and prototyping.
DIY for robust prototyping or short run is a good option.
You will need:
- Breadboard n' stuff
- Software for designing your board.
- Glossy paper.
- A laser printer.
- An iron.
- An ironing board.
- Copper clad board.
- Old toothbrush.
- Hydrochloric acid.
- Hydrogen peroxide.
- Fine grade sandpaper.
- Acetone.
- Fine tip indellible ink pen.
- Dremmel drill or circular saw to cut fibreglass.
- A drill with a 1 millimetre bit.
- Electronic components and soldering equipment.
Skills
- Soldering
- Computer literacy
- Basic workshop skills
Procedure:
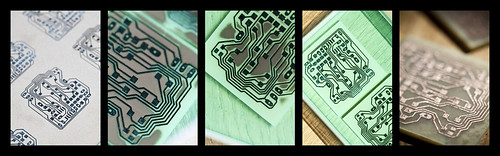
- Prototype device on a breadboard.
- Design board in eagle cad.
- Print design in black and white onto glossy paper using laser printer - make multiples.
- Clean board using sand paper then acetone.
- Iron print on to board.
- Soak off paper in water.
- Scrub remaining paper with toothbrush to remove.
- Inspect for broken tracks and overspill between tracks & repair.
- Mix etchant: acetone, water then acid. NOT A LOT!
- Place board in etchant.
- Wash with water when finished.
- Clean off the toner mask with acetone.
- Cut board to size
- Drill, flux and populate.
Safety precautions:
- Do this at your own risk.
- Always work in a ventilated space.
- Be careful with acid it is corrosive, keep it away from metal sinks.
- Dispose Of chemicals carefully.
- Always add acid to water, not the other way around.
- Always wear eye protection.
- Wear mask when cutting fibreglass.
Other areas/alternatives
- Enclosures
- Dual/multi-layer
- Silk screening (or additonal toner transfer for part names)
- SMD
Further reading
- Instructables
- Make
- Rapidonline
- Ebay
- SMD guide