A really basic and out of proportion model of a lamp based loosely on a building.
I've been wanting to get on and make a project that uses a "basic stamp" for ages - it's a microcontroller the size of a stamp that you can program from your pc using basic. Then I've come across some interesting stuff about how to control lights by thinking of them as elements of a matrix. So the idea would be to have a lamp that emulated a building (like the time lapses of building exteriors at night), with tennants or worker going in and out and switching lights on and off in seemingly random rooms.
Now that's fine with on/off commands, but what if you want on/off and colour changes - ooooooh, it could be really interesting.
I even thought you could have a lift up one side (or up the middle or anywhere or everywhere - mwahahahahahahaha).
Thursday, March 29, 2007
00202 New "Radial" lamp
After several attempts at getting wood and epoxy together in harmony, I'm really beginning to crack it - this one has been filled and sanded back and is now silky smooth on top. I think I can easily replicate this again.
Now all I really need (apart from finishing it) is to find out the safety issues that stop me from seeing LEDs encased in wood on the shelves in shops.
Here's more shots of the build so far:


The last one here is the epoxy sanded flat to the wood. I ended with 1200 grit sandpaper and finished it off with toothpaste, to see if it would make the finish ultra-smooth. It worked ok, but as I'm going to diffuse the ligh anyway, it doesn't matter if the epoxy surfaces aren't perfectly transparent.
The previous attemts at marrying the wood and epoxy together were getting better. This was the last attempt at a small lamp, which has got as far as all the wooden bits cut out and the epoxy set on the wooden face:


The only bummer here is that I painted epoxy on the acetate sheet, placed the wooden face on top to create a seal and preempt the "bleed" of epoxy onto the outside of the face plate. The idea was that if the whole face was covered in epoxy it would stick to the acetate and create a seal, stopping the epoxy from leaking out onto the face and causing a buging bit of plastic to stick out - it's a real pain to sand back. The result, however, was that I ended up with a plastic coated bit of wood. While this was smooth as you like, it just looks too "plasticky" and the idea was to seamlessly blend the wood and the epoxy so that one ran into the other - something I've now sorted out.
Now all I really need (apart from finishing it) is to find out the safety issues that stop me from seeing LEDs encased in wood on the shelves in shops.
Here's more shots of the build so far:
The last one here is the epoxy sanded flat to the wood. I ended with 1200 grit sandpaper and finished it off with toothpaste, to see if it would make the finish ultra-smooth. It worked ok, but as I'm going to diffuse the ligh anyway, it doesn't matter if the epoxy surfaces aren't perfectly transparent.
The previous attemts at marrying the wood and epoxy together were getting better. This was the last attempt at a small lamp, which has got as far as all the wooden bits cut out and the epoxy set on the wooden face:
The only bummer here is that I painted epoxy on the acetate sheet, placed the wooden face on top to create a seal and preempt the "bleed" of epoxy onto the outside of the face plate. The idea was that if the whole face was covered in epoxy it would stick to the acetate and create a seal, stopping the epoxy from leaking out onto the face and causing a buging bit of plastic to stick out - it's a real pain to sand back. The result, however, was that I ended up with a plastic coated bit of wood. While this was smooth as you like, it just looks too "plasticky" and the idea was to seamlessly blend the wood and the epoxy so that one ran into the other - something I've now sorted out.
00201 Winning again
Another cup - this time is called the November cup. I can't remember what the criteria are for winning, because it happened so long ago. The deal is that I had to do a tie shoot against Pete Jory, but we didn't get round to having it until now. The good thing about this one, like the championship, is that there were no handicaps allowed, so it's just down to the score. One more tie shoot to go for the Falla cup - a three way shoot out. This one was my first tie shoot and it was quite nerve wracking - Pete got 96 and I got 98. I don't think I got him on top form, but there you go.
Sunday, March 18, 2007
00200 Collections and more lamps and other stuff
So now Flickr has collections, all our photos have been reorganised so that we can display the stuff in a much easier to browse sort of way. Mine is here.
Fullbore season has begun and I'm trying a new rifle, not that I can shoot for shit in windy weather - man I'm going to have to figure that one out.
The lamps are coming along, although it's all a bit rough n' ready at the moment.
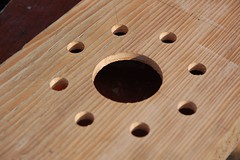
This first attempt at making the face for a small lamp ended in failure because the epoxy spilled out under the face of the wood and the rings just came away:


On this batch I decided to print out the patterns (done in Powerpoint), sprayfix them to wood, cut them out, sprayfix acetate sheets to them and then pour the epoxy into the holes through the back. Worked a treat as an experiment - the epoxy sits completely flush with the face of the wood, bit there were too many bubbles in the epoxy. Maybe it was because I should have sealed the wood first, at any rate, they still look very promising:


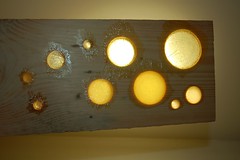
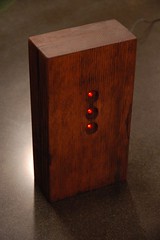
This last one was just a bit of a laugh, really. I had some epoxy left over, so I split a block from a palette in half with an axe, then drilled three holes in the front randomly. then I poured epoxy in to make the lenses. Next I routed out the cavity for the leds and then I shoved them in and hot glued it together to see what it would look like. It not only worked, but I messed around with some rainbow leds that I bought - now when I turn the lamp on I have a choice between reading lamp and ambient colour-change lamp.


Now all I need to do is repeat this last experiment, but make the face a bit nicer. Maybe have a large central hole for the reading lights and smaller holes dotted all around it, each with a rainbow led in it.
The only flaw with this is that you would have thought that a reading light was no good if it projected straight forwards (instead of down), but because we have a ledge behind the bed, it works perfectly.
Fullbore season has begun and I'm trying a new rifle, not that I can shoot for shit in windy weather - man I'm going to have to figure that one out.
The lamps are coming along, although it's all a bit rough n' ready at the moment.
This first attempt at making the face for a small lamp ended in failure because the epoxy spilled out under the face of the wood and the rings just came away:
On this batch I decided to print out the patterns (done in Powerpoint), sprayfix them to wood, cut them out, sprayfix acetate sheets to them and then pour the epoxy into the holes through the back. Worked a treat as an experiment - the epoxy sits completely flush with the face of the wood, bit there were too many bubbles in the epoxy. Maybe it was because I should have sealed the wood first, at any rate, they still look very promising:
This last one was just a bit of a laugh, really. I had some epoxy left over, so I split a block from a palette in half with an axe, then drilled three holes in the front randomly. then I poured epoxy in to make the lenses. Next I routed out the cavity for the leds and then I shoved them in and hot glued it together to see what it would look like. It not only worked, but I messed around with some rainbow leds that I bought - now when I turn the lamp on I have a choice between reading lamp and ambient colour-change lamp.
Now all I need to do is repeat this last experiment, but make the face a bit nicer. Maybe have a large central hole for the reading lights and smaller holes dotted all around it, each with a rainbow led in it.
The only flaw with this is that you would have thought that a reading light was no good if it projected straight forwards (instead of down), but because we have a ledge behind the bed, it works perfectly.
Tuesday, March 13, 2007
00199 Won
So it would appear (because of the facts of the matter) that I am the Island .22 Rifle Champion - or "World Champion" as Meriel likes to call me now (this will probably become annoying, after which she will be happy, having achieved her aim).
All bow down before me or I'll be better than you at shooting (maybe).
All bow down before me or I'll be better than you at shooting (maybe).
Friday, March 09, 2007
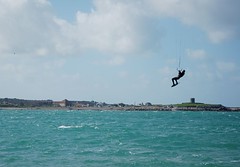
00198 Kitesurfing at Ladies again
But this time with images. Grandma looked after Cara which meant that I could drag Meriel down to the beach. She donned her wetsuit and got in the water to take piccies. She even got a ride - mike got her to hold on and dragged her through the ware with the kite - not too fast considering their combined weight is 19 stone.
Not only that, but here's the videos. First the backloop:
Then a little jump:
And finally just cruising up and down:
Not only that, but here's the videos. First the backloop:
Then a little jump:
And finally just cruising up and down:
Thursday, March 08, 2007
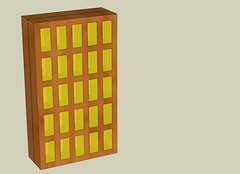
00197 Testing video from Sketchup
Just to illustrate the sort of thing I had in mind and also to se what the video exported from sketchup looks like. It seems good enough to get the general idea:
In reality, the holes would probably be different sizes and in different poitions. Not to mention the fact that none of the lines would look so clean.
In reality, the holes would probably be different sizes and in different poitions. Not to mention the fact that none of the lines would look so clean.
00196 Epoxy lenses for the lamps
So I poured some epoxy int holes drilled in a piece of old wood. Some was thin, some thick, some diffused with bubbles and coloidal silica. But I'm still not sure about how much to use to diffuse the light, and of course, it depends on how much light is being emitted.
I also played with the new 3watt power LEDs that I got from Rapid and I'm still not sure a) how hot I should let them run and b) whether it's safe to use them in a lamp. However, it's for a reading lamp, so it'll be me using it and I'll always be around when it's on. So I guess the thing now is, why don't I just make a lamp and see how it goes - yes, that's the way forward. Simple is best, so I'll try keeping the temperature of the LEDs down (which also means that the light will be comparatively dim) and mount them in a block of wood taken from a pallette - you know the cuboid blocks used to divide the upper and lower surfaces.
The thing that gets me about the LEDs is that you can run them very hot or not and if you want to have them at their highest intensity (i.e. the intensity at which they will still have a good long life), you have to take a leap of faith and just wire them up and hope they last. I think that way forward is to have more of them run dimmer for the moment. The other thing about them is that they are quite sensitive and while I'd like to just wire them up this article about building a specialised circuit to feed the power to the LEDs leads me to believe that they should be approached in a more delicate fashion and be linked to a sort of regulator circuit.
Wednesday, March 07, 2007
00195 Winning?
Unbelievably I may have won the Guernsey smallbore shooting championshion. I had a good start to the season and have managed to hold a slim lead until yesterday, the last round. I've just got to wait 'till Thursday when the last of the competitors get to shoot - there weren't many, but hey. At worst I got a 99,97,96,98 in the last round and had a two point lead, at best it's a 100,99,97,98, so using a sort of law of kind of averages I reckon it's a 99,98,97,98 which would be a tall order to beat with a two point deficit to overcome. Still, as long as it's not a draw - anything but a draw. I don't think I could handle a shoot-out (not a duel).
Sunday, March 04, 2007
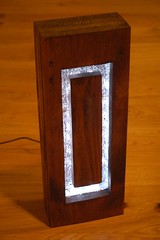
00194 More lamps
So I'm almost done with the next iteration of the lamp. It's bits of wood from the packaging of the heated towel rails. Then I've stuck in some silver foil and added LEDs.
Though I do say so myself, it looks wicked in the dark.
Now all I need is a bit of advice from someone who can tell me if it's really dangerous or not - especially if left on overnight.
Oh and I added a set to Flickr, seeing as this now counts as something I obsess over in a part-time fashion.


Though I do say so myself, it looks wicked in the dark.
Now all I need is a bit of advice from someone who can tell me if it's really dangerous or not - especially if left on overnight.
Oh and I added a set to Flickr, seeing as this now counts as something I obsess over in a part-time fashion.
Saturday, March 03, 2007
00193 LEDs and wood
Well I've started doing the lamp thing and the effects that you can create with just a block of old wood are really not too bad. I've been dyingg the wood and then using french polish. This version is yet to be polished, but considering the wood was lying outside after the building work, it's ok.
Shame I only had low power LEDs, although I'll be making something a little different with higher intensity light - I think staring really bright lights in the face without any diffusion will be unpleasant.
Got another one on the go now and all I need to do is to get some good power LEDs to go with it. They're really cheap, but the postage is always killer. Photos soon.
Subscribe to:
Posts (Atom)